Before installation, inspect the material for noticeable flaws/damage. Check that the subfloor and site conditions meet the requirements outlined in these guidelines. If you are not happy, don't put anything in and contact your supplier.
Measure the room at a right angle to the direction of COREtec flooring before laying it down. Planks or tiles in the final row should be at least 1/3 the width of the plank or tile for the optimum visual effect. Planks or tiles in the first row can be reduced to a smaller size for this reason. Do shuffle the boards to achieve a pleasing combination of colors. Place the boards in the direction of the main source of light, if possible.
We recommend placing crosswise to the existing flooring on wooden floors. Cabinets or fixed objects should not be placed on top of the COREtec lvp. Make sure you have enough room for expansion. All door jambs should be undercut, and wall moldings and transition strips should not be fastened to the floor or planks.
Let’s discuss the step-by-step process of COREtec flooring installation, so you don’t need any professionals.
Step 1: Start the installation from the left and move towards the right. Carefully insert spacers and edges where these wooden planks meet the wall.
Step 2: Insert tongue-side into the groove at an angle and drop in position to secure the short end of the plank. Carry on to the end of the first row.
Step 3: As a starting for the second row, use the remaining board from the first row. On adjacent rows, there must be at least 8 inches between plank end joints.

Step 4: Insert tongue-side into the groove at an angle and drop in position to lock long edge of the board. Slide the plank towards the end of the previous plank until the tongue-side slightly touches the groove.
Step 5: To guarantee a snug fit, use the hammer and tapping block to tap the long edge of the plank. Any gapping can negatively affect the locking system.
Step 6: If there is any gap left, follow a DIY and use a spare piece of flooring to bridge the gap.
Step 7: To lock the ends of the boards together, tap them together with a hammer and a tapping block. Remove the bridge and continue towards the wall until the last plank in the row is installed. To prevent damage to the locking profile, tap on the edge of the vinyl.
Step 8: To secure the final item in the row, use a hammer and a drawbar. Place a spacer at the end of the row and continue until the last row of installation.
Step 9: On the final row, use a hammer and a drawbar to lock the long edges of the planks.
Installing Under Door Jambs

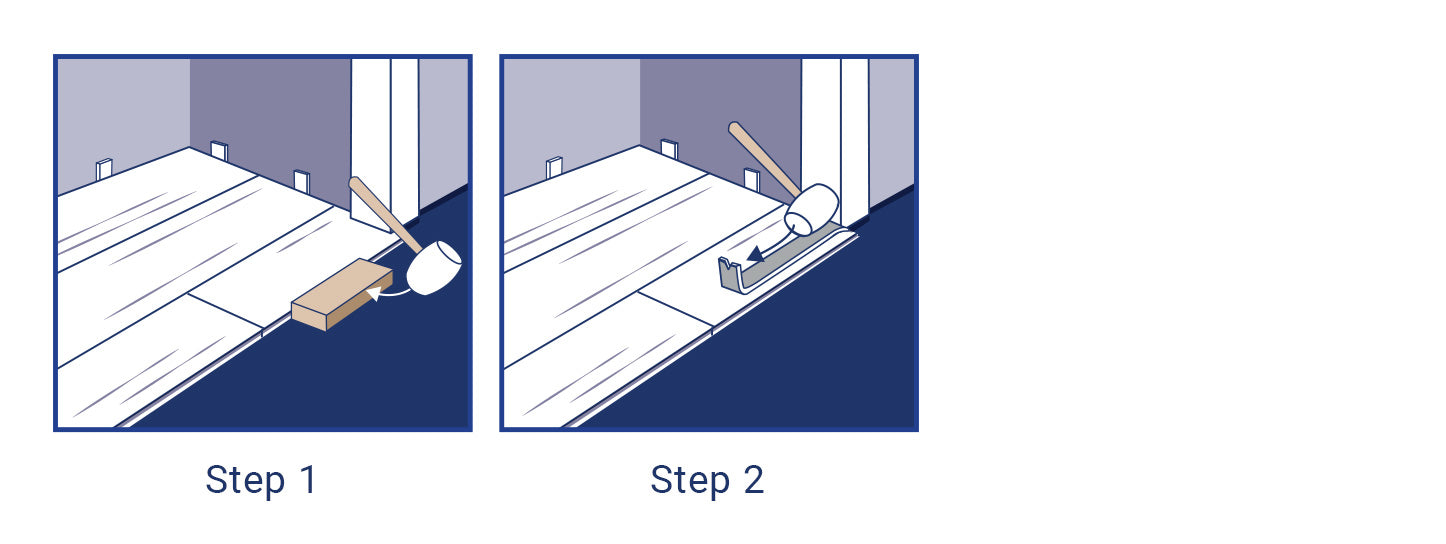
Step 1: To allow the COREtec vinyl plank to slide easily, carve a hole under the door frame. To lock the long edge, tap it using a hammer and a tapping block.
Step 2: To lock the short end of the board, use a hammer and a drawbar.
After Installation!
-
One of the last components to be placed in a project is flooring. To keep the floors safe while other trades finish their job before the final cleanup.
-
Remove any dirt or debris from your floor with a dust mop or a vacuum.
-
Install any transition pieces if needed.


